If you really want to improve your coding skills, there is only one way: learn through actual practice.
The reason why a programming language is called a language is that its core is similar to any foreign language you learn.
When we are learning English, no matter how systematically and thoroughly a book summarizes it, after reading it you will feel, oh, I seem to understand it, but how much can you remember?
On the contrary, if you send someone who has not learned much foreign language abroad and let him study and speak at the same time, he will slowly form his own language system. The same is true for learning programming.
If you want to talk about actual combat, the best way is to directly look at other people’s project code, set breakpoints and read it line by line, and then check it when you encounter something you don’t understand. In this way, you can slowly realize your own set of code system.
Here, based on my academic and work experience in computer vision, I have summarized a set of practical maps according to different directions of computer vision.
The full text is 17,000 words. Readers can selectively conduct practical learning according to their current research direction, which can help you save time while deepening your learning impression.
The full text is divided into four chapters, each of which corresponds to a popular research area in computer vision:
- Detection tasks
- Segmentation tasks
- Image processing tasks
- Face related algorithms
The mind map of the full text is shown below:
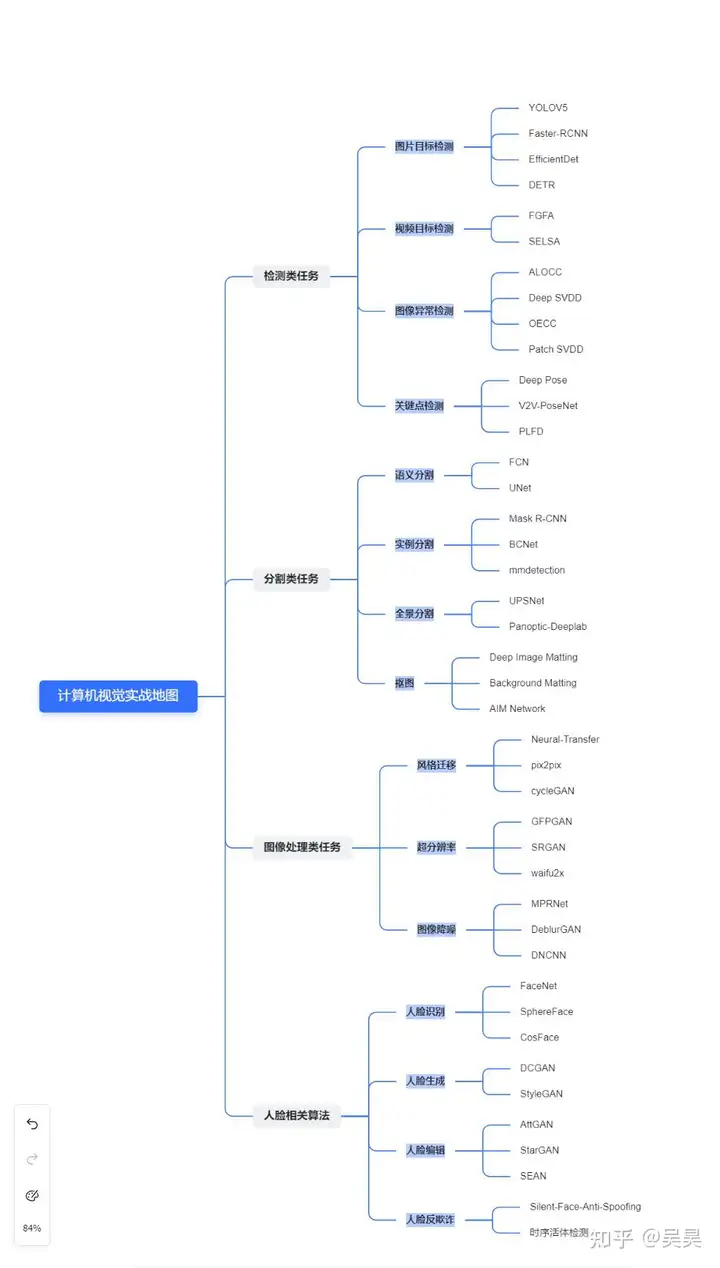
Figure 1. Mind map of the entire text
Each chapter corresponds to a popular research direction in computer vision, and each subchapter corresponds to a subtask under that direction. In each subchapter, some classic models of the task will be briefly introduced, and source code links will be attached for your reference and study.
Let’s get into the main text below.
1. Detection tasks
1.1. Image Object Detection
To put it simply, target detection tasks require locating the position of the target in a given image (usually using the coordinates and size of the box to represent the target position), and predicting the type of target (this type is usually a number, a closed set). Corresponding to this is the open set target detector, which can identify whether the current target has appeared in the training set.
When this type of task first started, object detection networks could be roughly divided into one-stage and two-stage detectors.
The so-called one-stage detection network mostly directly generates anchor boxes of different sizes and aspect ratios on different feature maps, classifies these different anchor boxes on the feature map and regresses their coordinates and sizes.
One-stage detectors are usually much faster than two-stage detectors. Common one-stage detectors include YOLO series, SSD, EfficientDet, etc.
Before the two-stage detector officially starts the detection, there will be a Region Proposal process, through which it can preliminarily determine whether there is a target in the current detection area.
If the target exists, it will be detected in detail and the size of the regression box will be regressed. The two-stage detector is usually more accurate than the one-stage detector, but the disadvantage is that it is slower.
The classic two-stage detector is the RCNN series (RCNN, Fast-RCNN, Faster R-CNN and Mask R-CNN)
The following are some classic object detection models, with Github links provided for your reference.
- YOLOV5 : YOLO series has been the leader among one-stage object detectors since the beginning. Although its various evaluation metrics may not be the highest in the same period, in one word, it is fast! Although the later YOLO series is relatively weak in the originality of the algorithm, various training tricks do have high application value in actual engineering problems. You can focus on understanding how various training tricks are implemented.
https://github.com/ultralytics/yolov5github.com/ultralytics/yolov5
- Faster-RCNN : This is the second most cited research result of He Kaiming on Google Scholar. It belongs to the RCNN series. After implementing Region proposal through RPN, the training of Fast RCNN can be done end to end. It is a classic two-stage detector. Various evaluation metrics basically beat the detectors of the same period, but the detection frame rate is relatively low.
https://github.com/jwyang/faster-rcnn.pytorchgithub.com/jwyang/faster-rcnn.pytorch
- EfficientDet : A masterpiece of Google Brain, it is also a one-stage detector, and is slightly less famous than the YOLO series. EfficientDet uses the BiFPN structure to achieve a deeper fusion of the feature maps of each layer obtained by Backbone, and can switch back and forth between D0-D7 during training through simple configuration. The only drawback is that the parameter adjustment in the entire paper is too metaphysical (although the final parameter adjustment effect exceeds that of YOLOV3 and Mask RCNN and other classifiers of the same period), which can be said to fully demonstrate the violent aesthetics of Google Brain’s wealth.

- DETR : After Attention is All You Need , transformers have become very popular, but they are mostly used in NLP or time series data processing. DETR is the first transformer model used in object detection . In the object detection task, DETR’s accuracy and detection frame rate are comparable to Faster RCNN. However, its disadvantage is that it is difficult to converge and requires a large amount of data for training. After all, it is the work of FAIR, which is rich in money. Students with insufficient GPU should use it with caution.
https://github.com/facebookresearch/detrgithub.com/facebookresearch/detr
1.2 Video Object Detection
Although image-based target detection can be directly applied to video target detection, the following problems will occur if the image target detection model is directly used to detect the video:
- The amount of computation will be extremely large, especially for high frame rate videos
- There are often some quality losses on single frames in videos, such as blur, out of focus, and sudden changes in lighting caused by motion.
Considering the above problems, many experts have begun to try to use the unique timing information of videos to optimize the accuracy of object detection in videos while reducing the amount of computation, thus making real-time detection of videos possible. Here are some classic video object detection projects.
- FGFA : For videos, moving objects may suffer from severe image quality degradation due to motion blur, loss of focus, etc. When the neural network extracts features from these damaged single frames, the receptive field where the target is located may not be effectively activated due to the image degradation. FGFA proposes a temporal feature fusion that integrates the feature map within the temporal domain into a key frame, thereby strengthening the activation of the target area in the frame.

- SELSA : The temporal information used by conventional video object detection algorithms is adjacent to key frames. However, in “Sequence Level Semantics Aggregation for Video Object Detection” (SELSA), the authors believe that all frames in the entire video that have a high degree of similarity to the target should contribute valid information, rather than just adjacent frames. Therefore, SELSA uses random sampling of the entire video sequence to integrate information.
1.3 Anomaly Detection
The object detectors mentioned above are usually trained on a dataset with closed labels. For example, if we have a dataset of cat and dog images, the images in this dataset only contain two types of images, cats and dogs, and two types of labels. The detector trained on this dataset can only detect cats and dogs.
However, in actual application, this training method has major problems. Let’s take the scenario of tumor screening as an example.
If we want to train a neural network to screen tumor images, the first problem we will encounter is that there will be very few positive samples (images containing malignant tumors) in the data set, because the vast majority of people are healthy.
Secondly, normal organs look similar, but abnormal tumors may have strange appearances. At this time, it is basically difficult to activate the neural network through a fixed pattern.
In this case, it is necessary to train the classifier through anomaly detection.
Currently, anomaly detection is roughly divided into two types, one is One-Class Classification and the other is Out-of-Distribution Detection.
Let’s use tumor screening as an example to illustrate the so-called One-Class Classification.
In the process of collecting data, although there is little tumor data (few positive samples), there is a lot of normal organ data (many negative samples), and normal organs usually have a relatively fixed appearance (relatively fixed patterns).
In the actual training process, we need to train a neural network to effectively express the negative samples of the data set (such as the extracted high-dimensional vectors). However, when we find that the expressions of some inputs deviate excessively from the expressions of negative samples during use, we consider the input data to be abnormal.
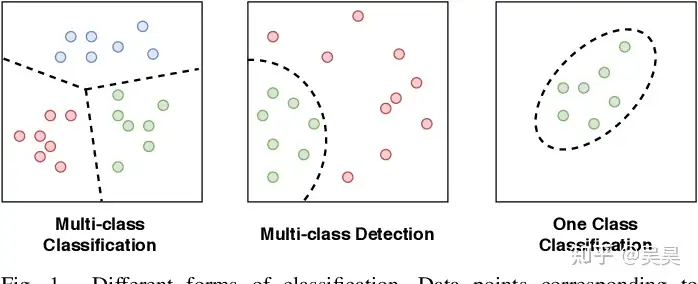
Figure 2. One-Class Classification example
Out-of-Distribution Detection is a model that effectively expresses multiple types of data to form a mixed distribution. For example, our neural network can extract the effective representation of the numbers in Mnist. All the pictures of these 10 numbers form a mixed distribution composed of 10 clusters. When a picture that does not belong to these 10 numbers is sent to the neural network, the high-dimensional vector of this picture extracted by the neural network must be able to fit the mixed distribution of the 10 numbers. This is Out-or-Distribution Detection.
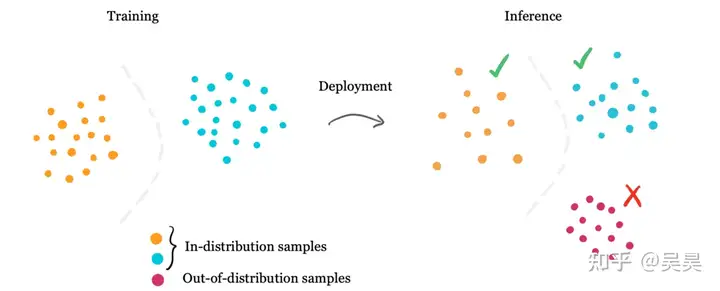
Figure 3. Out-of-Distribution example
Below we list some classic projects in anomaly detection.
- ALOCC : The full name is “Adverrsarially Learned One-Class Classifier for Novelty Detection”. This model consists of two parts. The first is an encoder and decoder (Auto Encoder & Decoder). The Encoder is responsible for extracting effective information from the image, and the Decoder is responsible for reconstructing the image. The second part is a Discriminator similar to the GAN structure. The function of this module is to determine whether the image generated by the decoder comes from a class that exists in the data set. If the input image does not exist in the training data set, the quality of the image restored by the encoder and decoder will be very poor, so the Discriminator can determine whether the input image type exists in the training set.
https://github.com/khalooei/ALOCC-CVPR2018github.com/khalooei/ALOCC-CVPR2018
- Deep SVDD: The model comes from the paper “Deep One-Class Classification”. After training a neural network to extract image features, the model uses a support vector machine to distinguish whether the current data belongs to the normal class or the abnormal class. The paper has been cited more than 900 times, which is considered a highly cited paper in this field.
https://github.com/lukasruff/Deep-SVDD-PyTorchgithub.com/lukasruff/Deep-SVDD-PyTorch
- OECC: The model comes from the paper ” Outlier Exposure with Confidence Control for Out-of-Distribution Detection “. This paper proposes a new loss function. The neural network trained by this loss function and training method can effectively detect inputs outside the distribution of the existing dataset without much impact on the detection accuracy of the existing dataset. And this is not only used for image detection, but also for text OOD detection OOD detection.

- Patch SVDD: This model was proposed by Seoul University. It draws on the idea of Deep SVDD mentioned earlier. The model extracts the features of spatially close image patches. Since adjacent image patches usually have similar features, these image patches can be mapped and then the model can be trained using unsupervised methods.
1.4 Keypoint Detection
Key point detection is the detection of artificially defined key points in a specific object, such as face key points, body key points, robotic arm key points, etc., so as to measure the state of this specific object at a certain moment.
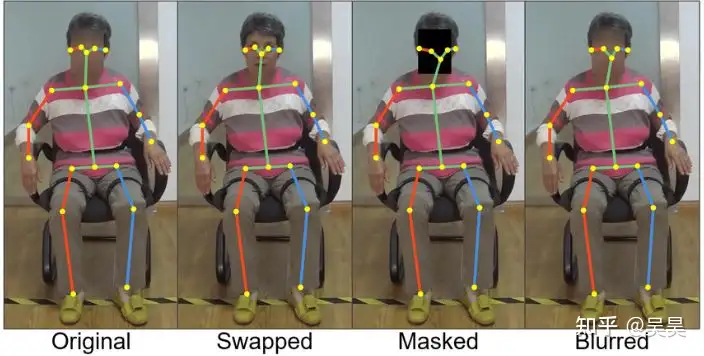
Figure 4. Example of human key point detection
Measuring the state of a specific object has many application scenarios, such as human micro-expression estimation, posture estimation, behavior recognition, etc. It has very wide applications in the fields of human-computer interaction and unmanned driving.
Let’s take a look at some classic projects of key point detection.
- Deep Pose: This model is also a masterpiece of Google. It can be said to be the pioneer in solving the problem of human posture estimation through deep learning. It had a subversive impact at the time. Before this model, human posture estimation was done through image processing and template matching. After receiving the input image, Deep Pose regresses the coordinates of some key points of the human body (such as elbow joints and shoulder joints) to obtain a rough posture of the human body.
- V2V-PoseNet : This model comes from the paper “V2V-PoseNet: Voxel-to-Voxel Prediction Network for Accurate 3D Hand and Human Pose Estimation from a Single Depth Map”. Usually, the key point coordinate regression problem is done directly on the two-dimensional image, but this model projects the two-dimensional image into three-dimensional space and uses three-dimensional convolution to regress the key point coordinates. This method can solve the image distortion problem caused by the three-dimensional perspective activity of the image to a certain extent; at the same time, compared with directly predicting the key point coordinates, the model actually outputs the probability prediction of a certain joint point to which the corona belongs.
https://github.com/dragonbook/V2V-PoseNet-pytorchgithub.com/dragonbook/V2V-PoseNet-pytorch
- PFLD : The full name is “A Practical Facial Landmark Detector”, produced by Tencent AI Lab. In the scene of facial key point detection, a situation that often occurs is that the angle of the face is too tricky, making it difficult for the model to locate the key points on the face. Therefore, the model will estimate the angle of the face during the training process to alleviate the impact of the picture on the model when the face is at an extreme angle; at the same time, the loss function of the model gives a greater weight to pictures at extreme angles, so this type of data can contribute a greater gradient during training; the last point is what I personally think is very awesome. Considering the problem of engineering implementation, this model is very small and can run at a high frame rate on the mobile terminal. It is a small model that is very worth a try.
https://github.com/guoqiangqi/PFLDgithub.com/guoqiangqi/PFLD
2. Segmentation tasks
Image segmentation refers to dividing an image into several non-overlapping regions after calculating the color, texture, and geometry of the image. If the detection task is to classify a certain pixel block in an image, image segmentation can be understood as classifying the pixels in the image.
Traditional image segmentation methods include segmentation based on edge detection (such as Sobel operator, Laplacian operator to extract edges, etc.), and growing a pixel block based on the similarity of neighborhood pixels (such as the selective search used by RCNN in region proposal).
Current deep learning methods can directly segment images, usually using a mask of the same size as the image to represent the segmentation result. Common segmentation algorithms include semantic segmentation, instance segmentation, and panoramic segmentation. The figure below shows the differences and commonalities between these segmentation methods.

Figure 5. Visualization of different segmentation algorithms
2.1 Semantic Segmentation
Semantic segmentation is the pixel-level recognition of an image, which assigns all pixels in the image to a specific class, and pixels of different classes do not overlap with each other.
Through semantic segmentation, we can know what category a certain area in the image belongs to. For example, through semantic segmentation technology, the computer can know that a certain area in an image is a pedestrian.
However, when this category is a specific countable category, semantic segmentation technology cannot know how many entities belonging to this category there are in the image. For example, it can predict that a certain area is a person, but it cannot predict how many people are in the current image.
Here are some classic semantic segmentation projects recommended.
- FCN: Fully Convolutional Network, produced by UC Berkeley, is a pioneering work based on deep learning for semantic segmentation. It has been cited more than 30,000 times and is a model that cannot be avoided in the field of semantic segmentation. This model has many innovations. First of all, compared with the general neural network, which will have a fully connected layer at the end for classification or regression, this model proposes a fully convolutional structure, that is, FCN is composed entirely of convolutional layers; at the same time, this model also proposes a reverse convolution method to upsample the feature map, so that the final resolution of the feature map is consistent with the original image, thereby obtaining the segmentation result.
https://github.com/wkentaro/pytorch-fcngithub.com/wkentaro/pytorch-fcn
- UNet: UNet is a segmentation model proposed in 2015. When it was proposed, it was intended for medical image segmentation, or more precisely, to solve the segmentation task at the cell level. Since the model is continuously downsampling and upsampling, the network structure is in a “U” shape, hence the name UNet. The model won first place in the ISBI cell tracking competition that year.
https://github.com/milesial/Pytorch-UNetgithub.com/milesial/Pytorch-UNet
2.2 Instance Segmentation
Semantic segmentation technology is a pixel-level classification technology, which means that each pixel in the image will be assigned a category. However, if different individual instances of the same category are not distinguished, for example, if the image contains a group of people, then through instance segmentation technology, the pixels belonging to this group will be assigned the same label, but different people in the group will not be distinguished.
In the above situation, if you want to distinguish different people in the crowd, you need to use instance segmentation technology.
Through instance segmentation technology, not only can we distinguish which category the pixel belongs to, but different individuals in the same category can also be effectively distinguished.
- Mask R-CNN: When mentioning instance segmentation, we have to mention Mask R-CNN, which is also the work of He Kaiming, an upgraded version of Faster R-CNN. First of all, compared with Faster R-CNN, this paper has an innovation in RoI Align. Compared with Faster R-CNN, which directly performs RoI Pooling on the RoI on the Feature Map, RoI Align uses bilinear interpolation to make the original discrete operation in the Pooling process become a continuous operation, thereby reducing the error after the feature map is restored to the original image. In addition to the object detection branch, the network adds an instance segmentation branch, so that the network can support instance segmentation operations.
https://github.com/matterport/Mask_RCNNgithub.com/matterport/Mask_RCNN
- BCNet: The full name is “Deep Occlusion-Aware Instance Segmentation with Overlapping BiLayers”. In the instance segmentation task, a difficult problem to solve is how to segment objects with severe occlusion. This paper proposes a two-layer convolutional network. In this structure, the GCN in the upper layer is used to detect occluded objects, while the GCN in the lower layer is used to detect occluded objects. In this way, the boundary between occluders and occluded objects can be effectively distinguished, thereby obtaining a better segmentation effect.
https://github.com/lkeab/BCNetgithub.com/lkeab/BCNet
- mmdetection: This project is not a specific model, but the implementation of many models (such as Mask-RCNN, MaskFormer, ConvNExt, etc.). This project has been continuously maintained, and this project is based on Pytorch. Reading its source code is a very good learning material, both at the algorithm implementation level and at the framework learning level.
https://github.com/open-mmlab/mmdetectiongithub.com/open-mmlab/mmdetection
2.3 Panoptic Segmentation
As mentioned before, one disadvantage of semantic segmentation is that it is impossible to know the number of specific instances in the image. But the reality is that not all classes in the image are countable. For example, in a street view image, pedestrians, vehicles, and trees are countable, but streets and skies are not.
Instance segmentation techniques usually segment countable targets with clear geometric edges, but do not define background targets (such as streets and skies).
To address the above issues, Facebook AI Research (FAIR) and Heisenberg University of Germany proposed panoramic segmentation technology.
Panoptic segmentation technology can be described as two subtasks, namely Object Instance Segmentation and Stuff Segmentation.
First, Object Instance Segmentation segments the countable objects in the image and assigns them labels and unique IDs. This way, we can not only know which area in the image belongs to which label, but also know how many such instances are contained in the image.
At the same time, Stuff Segmentation assigns a label to pixels in the image that do not have fixed and clear geometric boundaries and uncountable areas (such as sky, streets, rivers, etc.)
To put it simply, panoptic segmentation can actually be seen as a combination of semantic segmentation and instance segmentation.
The following is a brief introduction to the related models of panoramic segmentation.
- UPSNet: The full name is “A Unified Panoptic Segmentation Network”, an oral paper for CVPR 2019. Before this model, the panoramic segmentation task usually required two independent branches to perform instance segmentation and panoramic segmentation tasks respectively, but in UPSNet, a single network is used as the model backbone to realize the feature representation that can be shared by the two tasks, and the two tasks are realized separately through two heads at the end of the backbone.
https://github.com/uber-research/UPSNetgithub.com/uber-research/UPSNet
- Panoptic-Deeplab: This model comes from the paper “Panoptic-DeepLab: A Simple, Strong, and Fast Baseline for Bottom-Up Panoptic Segmentation”. The usual way of panoramic segmentation is to generate the results of semantic segmentation and instance segmentation at the same time, and then fuse the two results. However, this method causes two problems. First, the reasoning stage will be very slow because two results need to be generated; second, the results of semantic segmentation and instance segmentation may conflict, which may affect the accuracy of the model in the process of merging the results. This panoramic segmentation method is also called the top-down segmentation method. In order to solve the above problems, this paper proposes a bottom-up segmentation method, that is, first generate the results of semantic segmentation, and then merge the pixels belonging to the same object instance in the semantic segmentation according to the results of semantic segmentation and the information in other pictures. This can not only speed up the reasoning stage, but also reduce the conflict between semantic segmentation and instance segmentation.
https://github.com/bowenc0221/panoptic-deeplabgithub.com/bowenc0221/panoptic-deeplab
2.4 Matting
Matting is actually a type of image cutout problem. In the Matting task, what needs to be segmented is the foreground and the background. However, compared with the three image segmentation techniques mentioned above, Matting belongs to soft segmentation while various Segmentation techniques belong to hard segmentation techniques.
The so-called hard segmentation technology means that when we assign a label to a pixel, it either belongs to an instance or to the background. There is no third possibility. In the soft segmentation technology, we not only need to determine whether the current pixel belongs to the foreground or the background, but also need to determine the degree of its integration with the background. Here we use aα channel.
Matting task is actually the previous step of image fusion. The reason for using this soft segmentation method is that if the segmented instances are pasted on other pictures by pure segmentation, the fusion effect will appear very stiff, especially when segmenting objects such as glass, water, and hair of portraits. The effect is shown in the following figure:
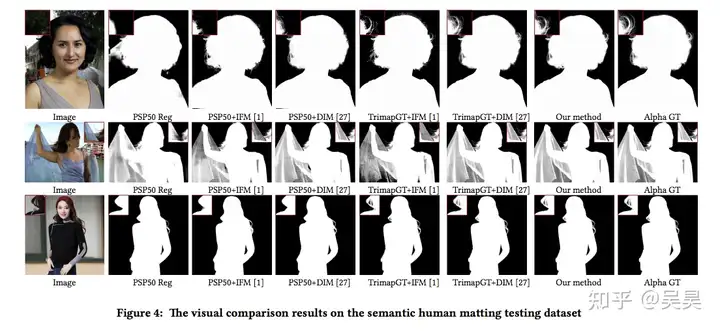
Figure 6. Portrait cutout effect display
And throughα channel to indicate the degree of fusion between the foreground and the background, the final fusion effect will appear much more natural.
- Deep Image Matting: This model consists of two parts, the first part is the matting codec, and the second part is the matting correction layer. The first part takes the original image and the three-dimensional image as input, and outputs a preliminary matting prediction. In the second part, the matting prediction isα channel is optimized and corrected to finally get the predicted result.
https://github.com/foamliu/Deep-Image-Matting-PyTorchgithub.com/foamliu/Deep-Image-Matting-PyTorch
- Background Matting: This paper is specifically for portrait matting. Usually, a trimap is required as input for matting tasks, but this paper proposes a method that does not require a trimap as input. Instead, it only requires a background image similar to the portrait image to be taken as input to get a prediction result for matting. Moreover, this model is very fast, and the official model is able to achieve a matting rate of 30 fps on 4K quality videos.
https://github.com/senguptaumd/Background-Mattinggithub.com/senguptaumd/Background-Matting
- AIM Network: General cutout tasks are usually for portraits, animals or some transparent man-made objects, and the types are relatively limited. AIM Network proposes an end-to-end method to generate a universal 3D image that is applicable to more types of images, and the semantic features learned in this process can guide the cutout network to better complete the cutout task. At the same time, this project also constructed a new cutout test set AIM-500, which contains 500 different types of natural images to test the performance of the cutout model.
https://github.com/JizhiziLi/AIMgithub.com/JizhiziLi/AIM
3. Image processing tasks
In the two types of tasks mentioned above, whether detection tasks or segmentation tasks, essentially require the model to extract information from the image and express it in a way that is easier for humans to accept.
Image processing tasks are to modify the information contained in the image itself in order to achieve a certain purpose.
For example.
If the image resolution is too low to be seen clearly, you can use image super-resolution technology to increase the image resolution, at least to make the image look clearer; if your hands accidentally shake when taking a photo and the image is blurred, the image deblurring technology can repair the image to a certain extent; or the old photo restoration and anime avatar generation that were very popular on Tik Tok some time ago, they generate images that match the style of the target domain based on the input image.
None of the scenarios mentioned above aims to extract information from images, but to modify the information contained in the images themselves to achieve certain goals.
The following introduces some typical applications of image processing tasks and corresponding models.
3.1 Style Transfer
I won’t go into detail about this, it should be quite common, that is, converting the input image into various other styles, such as anime style, ink painting style, oil painting style, or even the style of a specific painter.
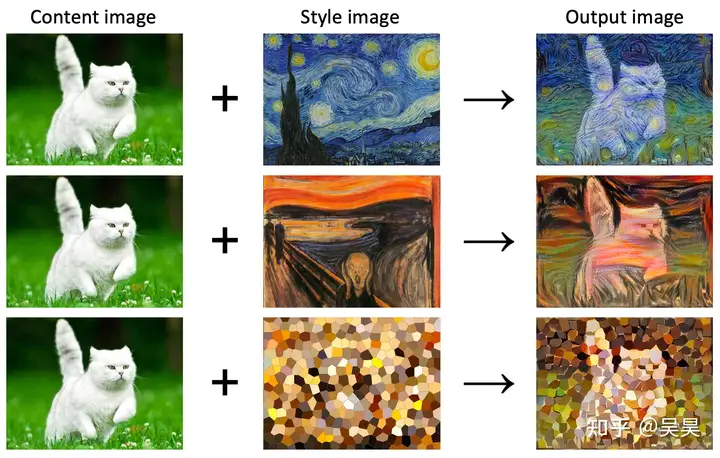
Figure 7. Style transfer effect display
Most style transfer models are based on Generative Adversarial Networks (GANs).
Here are some classic style transfer models.
- Neural-Transfer: The first model for style transfer based on neural networks. It comes from the paper “Image Style Transfer Using Convolutional Neural Networks”. To be honest, I was very impressed when I read this paper. In this paper, the features extracted by CNN are decoupled into two types of sub-features: style features and content features. This is the first amazing thing. The second amazing thing is that this model does not iterate the parameters of the model, but iterates the input “picture” (actually, the input is noise at the beginning), and the goal of the iteration is to make the input content features close to the content features of the content picture, and the style features closer to the style features of the style picture. After reading it, I had a feeling, how can it be done this way? But there is also a disadvantage to doing this, that is, the image generation process is very slow.
Neural Transfer Using PyTorchpytorch.org/tutorials/advanced/neural_style_tutorial.html
- pix2pix: This is an extended model based on cGAN. The data in the dataset of this model needs to be paired in advance. With picture 1 as input, the generator generates paired picture 2 (for example, input a grayscale picture of a car and generate the RGB picture corresponding to this picture), and the discriminator determines whether the current picture is generated by the generator or picture 2 paired with picture 1 based on the input picture 1.

- cycleGAN: Although the pix2pix mentioned above can map images from the original domain to the target domain relatively well, a big flaw of pix2pix is that the training images must be paired, which is often unrealistic; for example, if I want to transform a casually taken picture into the style of Hayao Miyazaki, we can’t find many such paired photos, which also leads to the limited application of pix2pix. Cycle-GAN bypasses this limitation. Through the design of the loss function, the original picture is first mapped to the target domain (this is the traditional GAN idea), and then the picture mapped to the target domain is mapped to the original domain (this is the so-called cycle). In this way, we don’t need to pair the training data, just organize the pictures into the original domain and the target domain.
3.2 Super Resolution
We all know that the resolution of an image is actually determined by the device that captures the image. You can see the resolution parameter when you look at the camera parameters. The core idea of image super-resolution is to reconstruct the image through signal processing methods without changing the hardware environment, thereby improving the image quality and resolution at the same time.
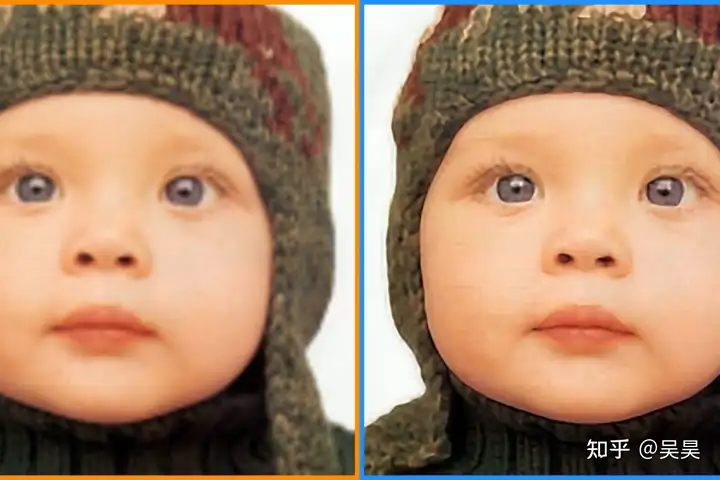
Figure 8. Super-resolution effect display
There are usually three methods for super-resolution reconstruction of images:
- Super-resolution technology based on a single image
- Super-resolution technology based on multiple images
- Super-resolution technology based on continuous video frames
It must be pointed out here that information does not come out of thin air, so the super-resolution technology based on a single image actually integrates some prior knowledge of high-definition images into low-resolution images to generate high-resolution images. In addition to using the vivid knowledge of high-definition images, the super-resolution technology based on multiple images and continuous frames of video can also use the contextual information of other photos to improve the resolution of the image.
Here we focus on the super-resolution technology based on a single image achieved through deep learning technology.
- GFPGAN : This model comes from the paper “GFP-GAN: Towards Real-World Blind Face Restoration with Generative Facial Prior”, which is Tencent’s open source super-resolution model for face images. GFPGAN can be divided into two parts, one is the degradation removal module, and the other is the face generation network. These two modules are connected to the coarse-to-fine channel using the CS SFT layer through direct potential code mapping. The role of the CS-SFT layer is to spatially modulate the segmented features and then let the features on the left pass directly, which can better preserve the feature information and more effectively combine the generation prior.
https://github.com/TencentARC/GFPGANgithub.com/TencentARC/GFPGAN
- SRGAN : Without saying too much, this is the first model that introduced the generative adversarial network into the field of super-resolution. This model is not limited to a specific field and is a general super-resolution model.
https://github.com/tensorlayer/srgangithub.com/tensorlayer/srgan
- waifu2x : This is a super-resolution model specifically for the animation field based on SRCNN, which is the pioneer of deep learning super-resolution technology. Before SRCNN performs forward processing on the image, it will first perform a Bicubic interpolation on the image. After interpolation, the image will pass through three modules of the model, namely: Patch extraction and representation module, Non-linear mapping module, and Reconstruction module . Among these three modules, the role of the fast extraction and representation module is to obtain the corresponding feature map through the input image, the role of the non-linear mapping module is to perform nonlinear activation on the feature map, and finally the reconstruction module performs a linear mapping on the output of the previous module.
GitHub - nagadomi/waifu2x: Image Super-Resolution for Anime-Style Artgithub.com/nagadomi/waifu2x
3.3 Image Denoise
Image denoising is a very classic topic in the image field. Traditional image denoising algorithms process images through filters in the spatial or frequency domain to filter out noise that meets specific characteristics (such as Gaussian noise, salt and pepper noise, etc.).
However, the noise in real situations is much more complicated than this kind of noise with fixed patterns. For example, noise caused by the environment, such as smoke, rain, fog and even damage to the image itself, will affect the image quality, and traditional methods are not able to cope with these noises.
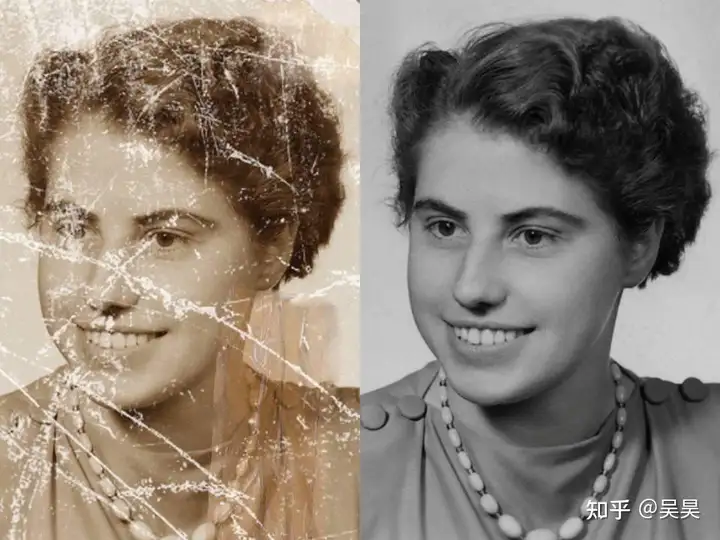
Figure 9. Old photo restoration
Therefore, the current image denoising algorithms are basically based on deep learning.
The following are some image denoising models based on deep learning.
- MPRNet: When filtering out noise and restoring image quality, how to balance image details and image context information in the spatial domain has always been a difficult point in this topic. MPRNet first learns the global context information of the image through UNet, and continuously fuses the information, and finally restores the image to high resolution through the ORB module, thereby ensuring the image details while also taking into account the image context information. This model was included in CVPR2021 and can be said to be the best and most efficient image denoising and restoration model at this stage.
https://github.com/swz30/MPRNetgithub.com/swz30/MPRNet
- DeblurGAN : This model is also a derivative application based on cGAN (one has to sigh at the influence of generative adversarial networks in the field of image processing), and is mainly aimed at restoring motion blur in images. The generator of DeblurGAN receives a blurred image as input, and the discriminator discriminates the vector after the restored image is merged with the original clear image. The goal is to determine whether the current input image is generated by the generator or the original clear image. The paper also found that restoring the blurred image before performing target detection can improve the accuracy of the detection model.

- DnCNN: One of the simplest models in the field of image denoising, from the paper “Beyond a Gaussian Denoiser: Residual Learning of Deep CNN for Image Denoising”. Compared with the models mentioned above, this DnCNN does not directly generate the denoised image, but outputs the noise pattern of the image, and finally uses the model’s noise to make a difference with the noisy image to obtain the denoised image.
https://github.com/SaoYan/DnCNN-PyTorchgithub.com/SaoYan/DnCNN-PyTorch
4. Face-related algorithms
Face-related algorithms have their own particularities. Although other algorithms are often used on faces, they are still listed here as a separate category.
The face-related algorithm that everyone is most familiar with and the one that we encounter most in daily life is face recognition. Compared with other recognition algorithms, the most important feature of face recognition is that face recognition strictly belongs to the category of open set recognition.
For general image recognition algorithms, the algorithm you train can only recognize as many categories as the data set contains. However, this is obviously not applicable in the field of face recognition, because you cannot create a data set that contains everyone’s faces.
Therefore, usually a b model is trained to extract sufficiently recognizable features from different faces, and then compare the examples of these features in a specific feature space to determine which person the face in the input image belongs to. In some scenarios, it is also necessary to be able to determine that the current face is not in the face library, that is, the current face is a stranger.
Since face recognition is currently mainly used in highly sensitive fields such as payment and security, the attack and defense of face recognition has been a hot research field since it was promoted and applied. Various face synthesis algorithms were also proposed during this period.
Here are some classic face-related algorithm models and github links.
4.1 Face Recognition
As mentioned earlier, the core goal of face recognition is not to directly train a model that can identify the target type, but to train a model that can extract effective features of the input image so that these features can be compared, similar features can be classified into one category, and dissimilar features can be divided into two categories.
- FaceNet : FaceNet is a very classic face recognition algorithm proposed by Google in 2015. It comes from the paper “FaceNet: A Unified Embedding for Face Recognition and Clustering”. The most outstanding contribution of this paper is the proposal of a loss function called Triplet Loss. The core idea of this loss function is to first select an anchor face image during the training process, and then select a positive sample and a negative sample based on this anchor image. The positive sample belongs to the same face as the anchor image, while the negative sample does not belong to the same face as the anchor image. During the training process, FaceNet abstracts the image into a 128-dimensional vector (which can be understood as an Embedding), and the role of Triplet Loss is to make the anchor vector closer to the vector corresponding to the positive sample image, and farther from the vector corresponding to the negative sample image, so as to achieve the purpose of smaller and smaller intra-class variance and larger inter-class variance.
https://github.com/davidsandberg/facenetgithub.com/davidsandberg/facenet
- SphereFace : The University of Georgia and CVPR 2017 proposed that although the Triplet Loss proposed by FaceNet also isolates the intra-class variance of the feature vector extracted by the model as small as possible and the inter-class variance as large as possible, the sampling of data by Triplet Loss during the training process is quite cumbersome and the training time is very long; however, if the model is trained directly through Softmax, the model only tries to reduce the intra-class variance as much as possible and cannot achieve the purpose of maximizing the inter-class variance; in order to solve this problem, the A-softmax loss function is proposed in the SphereFace model. This loss function maps the extracted features to a hypersphere. The core idea is that the angles of faces belonging to the same person on the sphere are as small as possible, while the angles of different faces on the sphere are as large as possible.

- CosFace : The core contribution of CosFace is the LMCL (Large Margin Cosine Loss) loss function. The core idea is to add a margin to the loss based on cosine distance, making the final judgment condition more stringent, and the time complexity of this loss function is the same as Softmax during training. Although the core ideas of CosFace and SphereFace are similar, CosFace simplifies the margin conditions, making it easier to derive the gradient during back propagation.
https://github.com/MuggleWang/CosFace_pytorchgithub.com/MuggleWang/CosFace_pytorch
4.2 Face Generation
Face generation technology mainly uses technologies such as generative adversarial networks to generate faces of people who do not exist in the world. If the face image is regarded as a high-dimensional vector, the core goal of the face generation model is to learn the distribution of face images in high-dimensional space.
In addition to real face pictures, face generation technology can also be used to generate faces of cartoon characters in specific styles. It has a large application space in assisting creation or in areas that are sensitive to portrait rights.

Figure 10. The faces in the 3x5 rectangle in the above picture do not exist in the world.
-
DCGAN : The full name of DCGAN is Deep Convolutional Generative Adversarial Network. Like ordinary GAN, it is also divided into two parts: generator and discriminator. However, DCGAN follows the following principles when designing so that the entire network structure can learn more features:
-
- Use convolutional layers instead of pooling layers in network design to avoid information loss
-
- Not using fully connected layers in the network
-
- Use batch-normalization to accelerate convergence
-
- Use Leaky ReLU as activation function
- StyleGAN : The outstanding contribution of StyleGAN is that it proposes a style-based generator, which makes the generated images more controllable and easier to understand. The generator of StyleGAN includes the following modules. The first is the style module, which is used at every resolution level of the synthesis network. The second is the random mutation module, which makes the generated images more realistic because many features in facial images can be considered random, such as hairstyle and hair color. The last module is the style-mix module, which enables the model to combine the features of the input information to generate new images.
GitHub - NVlabs/stylegan: StyleGAN - Official TensorFlow Implementationgithub.com/NVlabs/stylegan
4.3 Face-Editing
Usually, face images can be given many attributes, such as skin color, hairstyle, hair color, etc. The core goal of face editing is to modify the corresponding attributes in the image based on the given image.
At present, face editing technology is mainly used in pan-entertainment venues. For example, many expression-related filters in Tik Tok are based on this technology.
- AttGAN : This model comes from the paper “AttGAN: Facial Attribute Editing by Only Changing What You Want”. Its core contribution is to use a unified framework to complete face editing and integrate latent representation with face attributes. By separating the attributes from the latent representation, the edited attributes can be more accurate.

- starGAN : A facial attribute editing framework proposed at almost the same time as AttGAN. starGAN is named this way because it solves the problem of mapping the generator of the same model framework from one domain to multiple domains for a picture. This mapping relationship is represented by a graph like a star, so it is called starGAN (as shown in the figure below).
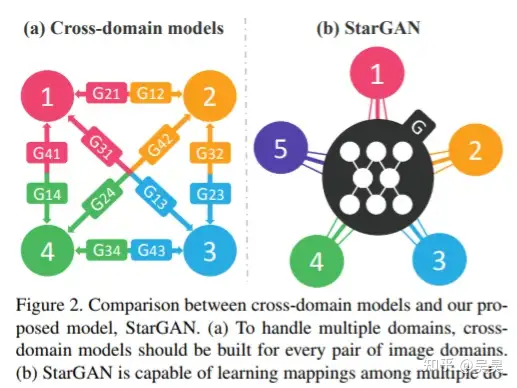
Figure 11. Mapping structure of starGAN
https://github.com/yunjey/stargangithub.com/yunjey/stargan
- SEAN : From the paper “Image Synthesis with Semantic Region-Adaptive Normalization”, this model is based on the GauGAN network. It inputs a mask with a region label of an image and then makes corresponding modifications to the regions marked by these masks. Unlike GauGAN, the model processes the mask and style code differently, which is somewhat similar to the style module in StyleGAN mentioned above. The processing results are shown in the figure below:
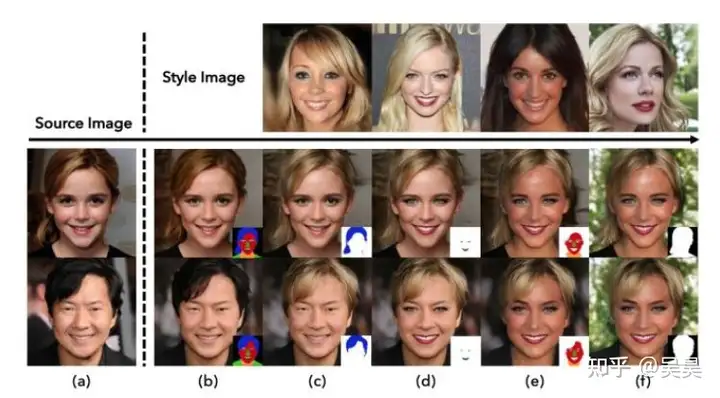
Figure 12. Schematic diagram of SEAN modifying facial attributes
4.4 Face Anti-Spoofing
As mentioned before, face recognition is currently widely used in areas that are extremely sensitive to security issues, and face synthesis and face editing technologies are becoming increasingly mature. In this context, how to ensure the security of applications based on face recognition has naturally become a research area.
- Silent-Face-Anti-Spoofing : The most common attack on face recognition is to directly use someone else’s photo to deceive the face detector. The purpose of liveness detection is to determine whether the image captured by the camera is a person or a picture of a person. The usual liveness detection method is to let the person in front of the camera do fixed actions based on a series of instructions. This method is the safest, but also very troublesome. Here is a project that performs liveness detection on the spectrum by Fourier transforming the image.
- Time-series liveness detection: Since the relative position of the person and the camera is relatively fixed during face recognition, in addition to using the image spectrum for face liveness detection, the depth of the image can also be estimated based on continuous frames to determine whether the current face is alive. We all know that the image itself has no depth. If you use a picture to deceive the face recognition system, you naturally cannot detect the depth of the scene.
The above is my classification of common computer vision tasks and the sorting out of classic models. In fact, the core goal is to enable everyone to find suitable projects based on the problems they are studying and to learn frameworks and programming knowledge purposefully.
Learning any framework or programming language is actually the same as learning a foreign language. No matter how systematic the learning materials are, what you learn today will be forgotten tomorrow. Everything is useless before you actually use it.
On the contrary, even if you don’t study systematically at the beginning, if you check and use it in the process, you will gradually form your own system and it will not be easy to forget.
It’s not easy to write, please like and collect my posts to support me!